Guide/SendApp Agent/Getting started
Dashboard tour: the chat and the main menus
The first time you log in to SendApp Agent, you land on the Chat screen. It's the operational heart of the platform: from here you read and reply to messages from every connected channel, launch campaigns, manage contacts, and configure the AI. This guide walks you through panel by panel, so you always know where to click.
Updated on June 16, 2026 · 7 min read
Before you start
- An active SendApp Agent account
- Signed in with your email and password
What this screen is for
The dashboard brings together, on a single page, the inbox for all your channels, the open conversation, and the tools to act on the contact. It's designed so you never have to change pages while you work: read on the left, reply in the center, act on the right.
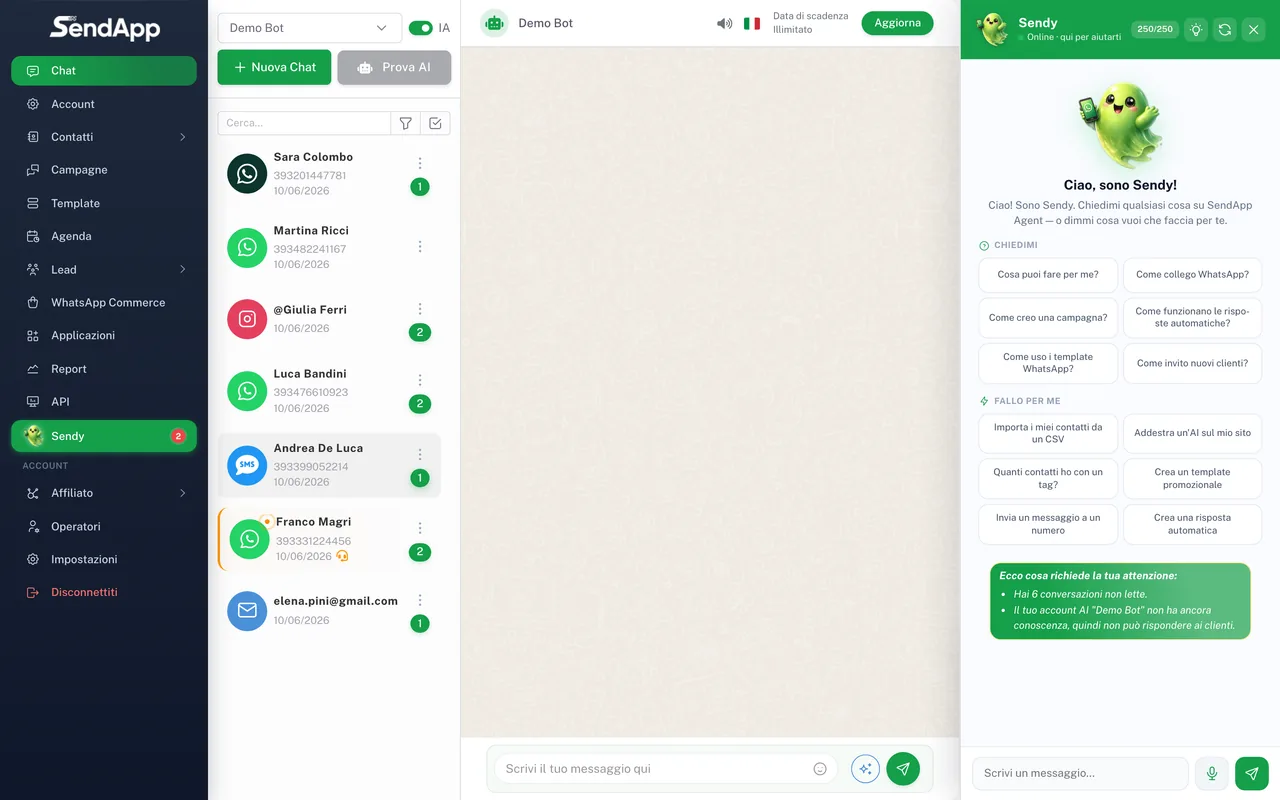
The three columns of the Chat screen
- Left column — Conversation list
- The list of all incoming chats, sorted with the most recent at the top. Each row shows the contact name, a preview of the last message, the time, and a dot for unread messages. At the top you'll find the search bar and the filters (by channel, read/unread, assigned to you).
- Center column — Conversation
- The message thread of the selected contact. At the bottom is the composer bar with attachments, emoji, voice notes, and the toggle to turn the AI on or pause it for that conversation.
- Right column — Contact details
- The contact card: name, number, tags, and custom fields. From here you edit the data without leaving the chat.
The side menu (main navigation)
On the sidebar you'll find the platform's sections. The items may vary based on your plan and your user's permissions:
- Chat
- The screen you're looking at: the unified inbox for all channels, with filters (all channels or a single channel, unread, operator requests, completed, archived).
- Account
- Where you create and train the AI (on a website, PDFs, text). Each “Account” is a bot you can connect to channels. Here you also set the assistant's language and rules.
- Contacts
- The address book/CRM with tags and custom fields.
- Campaigns
- Bulk sends over WhatsApp, WhatsApp Web, and SMS.
- Templates
- Your WhatsApp templates approved by Meta, used in campaigns and automations.
- Calendar
- Reminders (including recurring ones) and bookings, with optional sync to Google Calendar.
- Leads
- Potential customers and forms collected over WhatsApp (WhatsApp Flows).
- Applications
- The place where you connect channels (WhatsApp Meta/Web, Telegram, Instagram, Messenger, Email, SMS, Widget) and tools (Google Calendar, Google Sheets).
- Reports
- Statistics and AI Insights.
- API
- The developer keys to integrate SendApp with external systems.
- Operators
- Your team: sub-users with limited access.
- Settings
- Account profile and billing.
“WhatsApp Commerce” (product catalog and orders over WhatsApp) is also coming soon.
The channel selector
At the top, next to the account name, is the active channel selector. SendApp Agent merges multiple channels (WhatsApp, Instagram, Telegram, email, SMS, widget) into the same inbox: when you switch from one channel to another, some buttons in the composer bar change. For example, the microphone for voice notes and the emoji selector only appear where the channel supports them.
If you don't see a section in the menu, it's almost always a matter of permissions: operators have limited access compared to the account owner. See the “Operators and permissions” guide.
Message status indicators
Just like on WhatsApp, every outgoing message shows status checkmarks: one check = sent, two gray checks = delivered, two colored checks = read. If a message stays on a single check for a long time, it usually means the recipient didn't receive it (invalid number, closed window or, for templates, a missing payment method on the official number).
Common mistakes
- The conversation list is empty: no channel is connected yet. Go to Applications and connect at least WhatsApp.
- You can't message a contact first: on the official Meta API you can only start a conversation with an approved template; free text is only possible within 24h of the customer's last message. See “Create a campaign”.
- Automatic replies don't go out: check that the AI is active (toggle in the composer bar or in the Account settings) and that the Account is trained.
Ready to put it into practice?
Open SendApp and follow the steps in this guide. Need help? Support is one message away.